
Appearance
AdminCertificates
A certificate is a PDF a user earns when they meet the requirements you define. You build it in two parts: a template that controls how the certificate looks and what data appears on it, and a certificate that binds that template to the requirements a user must complete.
Open Certificates in the admin sidebar. Templates holds the designs, Certificates holds the earnable certificates, and Issued Certificates lists what users have earned.
Requiring all, or any, of the requirements
A certificate's Requirements section lists what a user must complete. The Requirements Mode selector at the top of that section decides how the list is read:
| Mode | Meaning |
|---|---|
| All (default) | The user must meet every requirement listed |
| Any | Meeting one of them is enough |
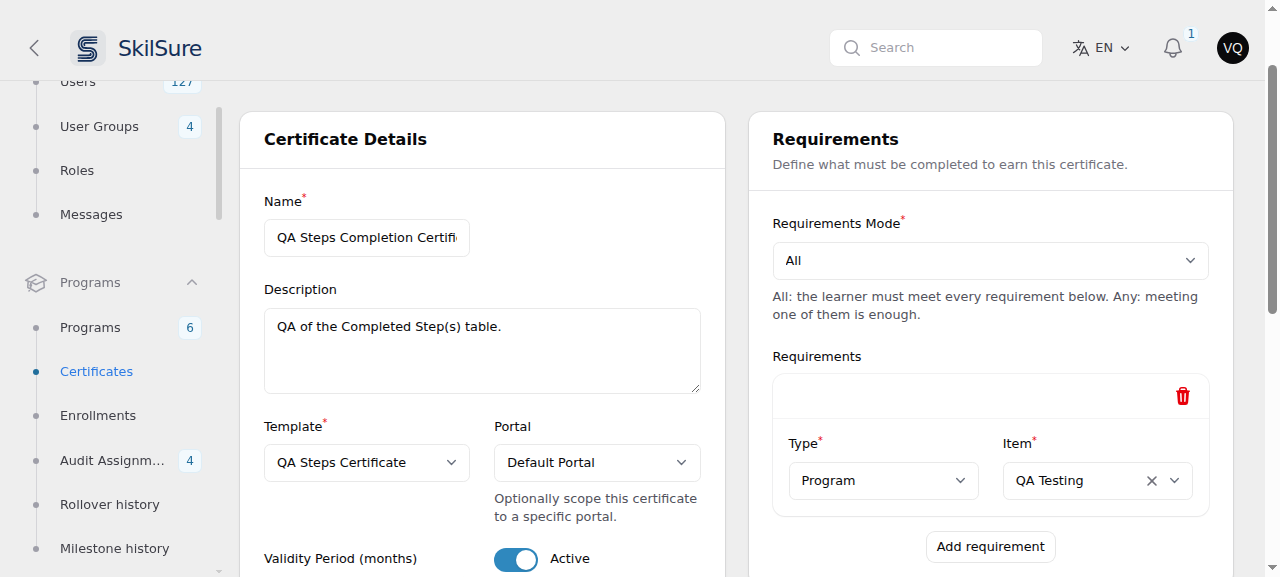 Certificates → Certificates → edit. Requirements Mode sits at the top of the Requirements panel, above the list it governs.
Any suits a certificate that can be earned by more than one route — several qualifying courses, say, where finishing any one should award it.
Switching to Any re-checks existing users
If you switch an existing certificate to Any, users who already qualify would otherwise wait for their next activity — which may never come if their program is finished. So switching to Any re-checks them straight away and awards the certificate where it's due.
This can award a lot of certificates at once on a large program, and each one emails the recipient. Switching back to All never removes a certificate anyone has already earned.
A certificate with no requirements is never awarded, in either mode.
When a certificate is awarded
A certificate is awarded the moment a user finishes something that satisfies its requirements — a program, a step, or a piece of content.
That only works for work finished after the certificate was set up. Two common situations leave a user qualified but empty-handed:
- The certificate was created after they finished. A user who completed the program in June, on a certificate you added in August, never had a moment for it to be awarded.
- Their completions were imported. Enrolments and completed steps brought over from another system arrive as data, not as someone finishing something, so nothing is awarded for them.
In both cases the user now gets their certificate the next time they open the certificate step — it is checked when the step is opened, and awarded if it is due. They are emailed as usual.
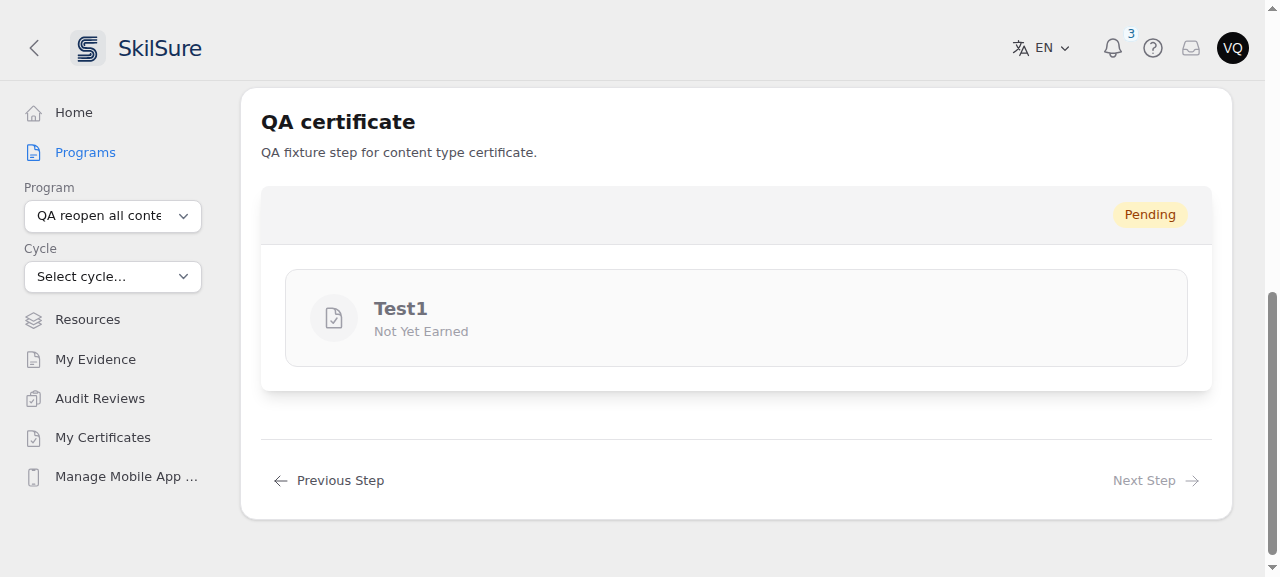 What a user sees on a certificate step they have not earned. If they do qualify, opening this step awards the certificate and the card turns green with View and Download.
Don't wait for them to come back
Opening the step only helps users who return. If a group finished long ago, ask your administrator to run a re-check for the certificate, which awards it to everyone who qualifies in one pass. A re-check can report how many are owed before it awards anything, and it is deliberately quiet — it does not email people about work they finished years ago.
Re-checking never issues a second certificate to someone who already holds one, and never restores one you revoked.
Logos and background
Open Certificates → Templates and edit a template. The Branding section holds the images printed on the certificate.
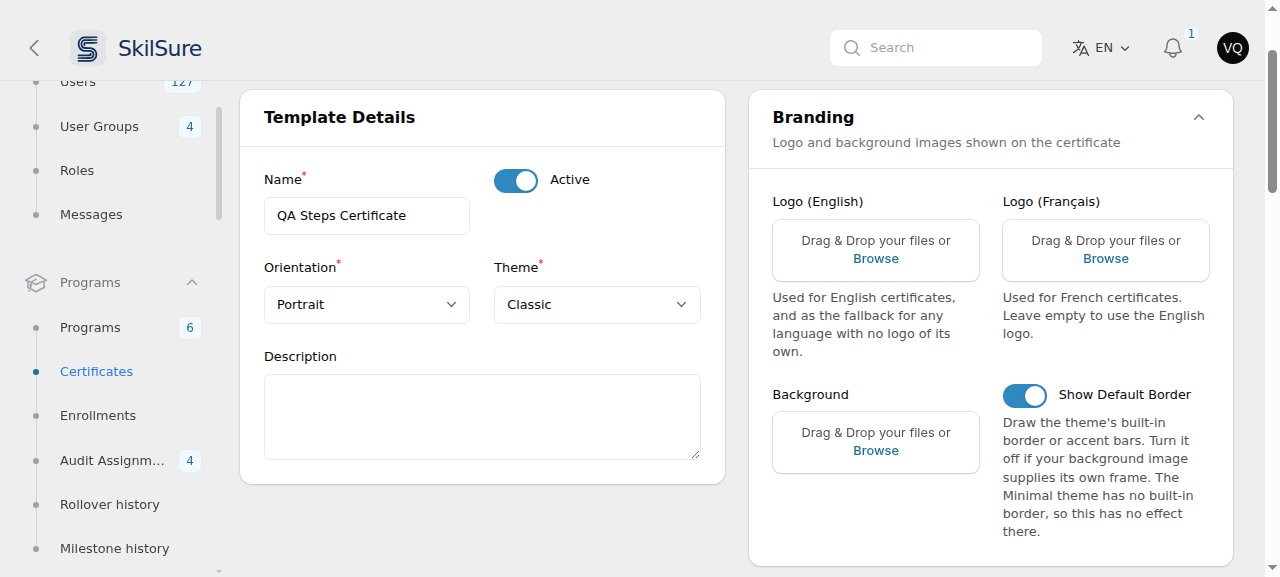 Certificates → Templates → edit. One template, one logo per language, and one switch for the theme's own border.
A logo per language
A certificate is printed in the recipient's language, so a template can carry a different logo for each one:
- Logo (English) — used for English certificates, and as the fallback for any language with no logo of its own.
- Logo (Français) — used for French certificates. Leave it empty to use the English logo.
You only need the second box if your logo differs by language — a bilingual wordmark, or an accredited body whose French name is rendered differently. Otherwise fill in Logo (English) alone and every recipient gets it.
Which logo a certificate gets
The closest match wins: the recipient's exact language first, then the base language (a fr_CA recipient falls back to a fr logo), then English. A recipient whose language you have no logo for still gets the English one, so no certificate is ever printed without a logo you supplied.
Clearing a logo clears it for good
Removing the image from Logo (English) leaves that language with no logo rather than reverting to whatever the template used before. Upload a replacement in the same save if you still want one printed.
Background and the default border
Background prints an image behind the whole certificate — a watermark, a full-bleed design, letterhead artwork.
Show Default Border decides whether the theme's own decoration is drawn on top of it. It is on by default.
- Classic draws a double-line frame around the page.
- Modern draws coloured accent bars (one on portrait, two on landscape).
- Minimal has no built-in decoration, so the switch has no effect there.
Turn the border off when your background supplies its own frame
The switch is the only thing that controls the built-in decoration — uploading a background does not suppress it. If your background image already has a border drawn into it, leave Show Default Border off, or the certificate prints both frames on top of each other.
What follows the recipient's language
A certificate is printed in the recipient's language, and most of what you author can follow them:
| What you author | Where | Per language? |
|---|---|---|
| Heading, Intro Line, Connecting Line, Body | Templates → edit → Certificate Text | Yes |
| Logo | Templates → edit → Branding | Yes — see A logo per language |
| Signer Title | Templates → edit | Yes |
| Certificate name | Certificates → edit | Yes |
| Signer Name | Templates → edit | No — a person's name is not translated |
| Background image | Templates → edit → Branding | No |
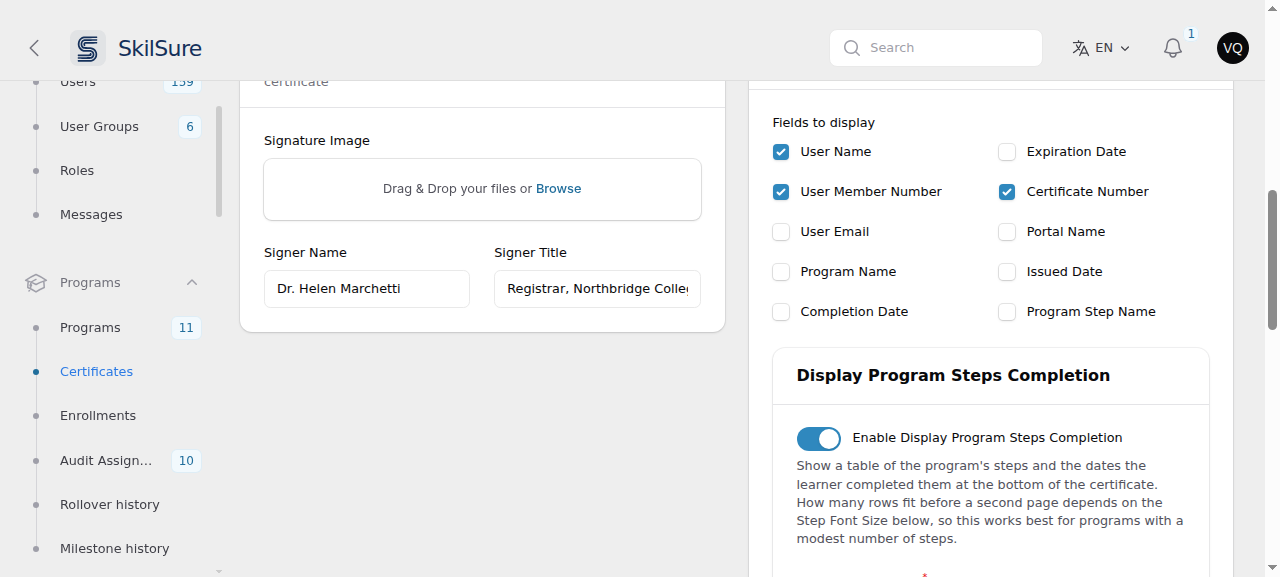 Certificates → Templates → edit. Signer Title follows the panel language shown in the top bar; Signer Name does not.
Each of the per-language fields works the same way: switch the admin panel to the language you want to write, type the wording, and save. Your other languages are left untouched, so you can fill in English today and French later.
Write the English first
A field with no wording in the recipient's language falls back to English, then to whatever you did fill in — so a certificate is never printed with a blank where your text should be. Filling English in first means every recipient gets something sensible while the other languages are still being written.
To remove a Signer Title, clear it in every language
Clearing the box in one language only makes that language fall back to another — the title still prints. Clearing it in all of your languages is what removes the line from the certificate entirely, and that is the intended way to drop a signer title you no longer want.
Already-issued certificates keep the name they were issued with
The certificate name is recorded onto each certificate at the moment it is earned, so that renaming a certificate later does not rewrite documents people already hold. Since that snapshot keeps every language, a French recipient still reads the French name — but wording you add after a certificate was issued does not reach it. Re-issue if you need an existing certificate to pick up new wording.
What appears on a certificate
Open Certificates → Templates and edit a template. The Data Fields section decides which pieces of information are printed.
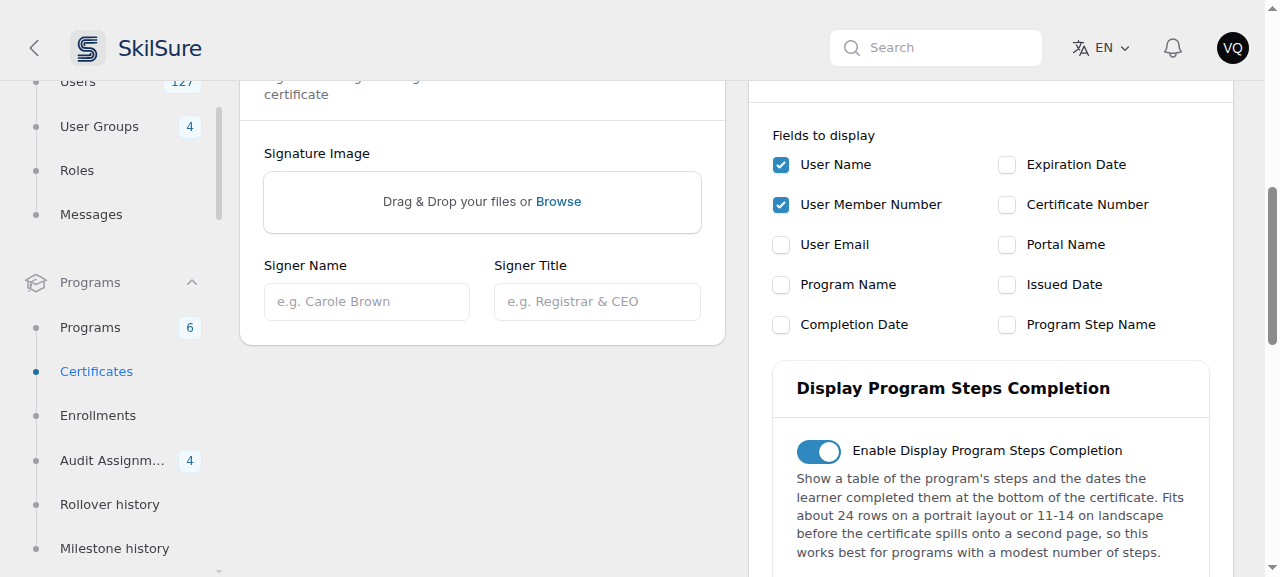 Certificates → Templates → edit. Tick the fields you want printed; each one is optional.
Fields to display is a list of tick boxes. Two worth calling out:
- User Name — the recipient's name, printed prominently under the heading.
- User Member Number — the member number from the user's profile, printed just below their name. Users with no member number recorded simply don't get the line, so it's safe to enable for everyone.
TIP
Nothing here is mandatory. A template with no data fields ticked still prints your heading and wording — useful for a purely decorative certificate.
Listing the steps a user completed
Some certificates need to show what the user did, not just that they finished. The Display Program Steps Completion section adds a Completed Step(s) table to the bottom of the certificate, listing the program's steps and the date the user completed each one.
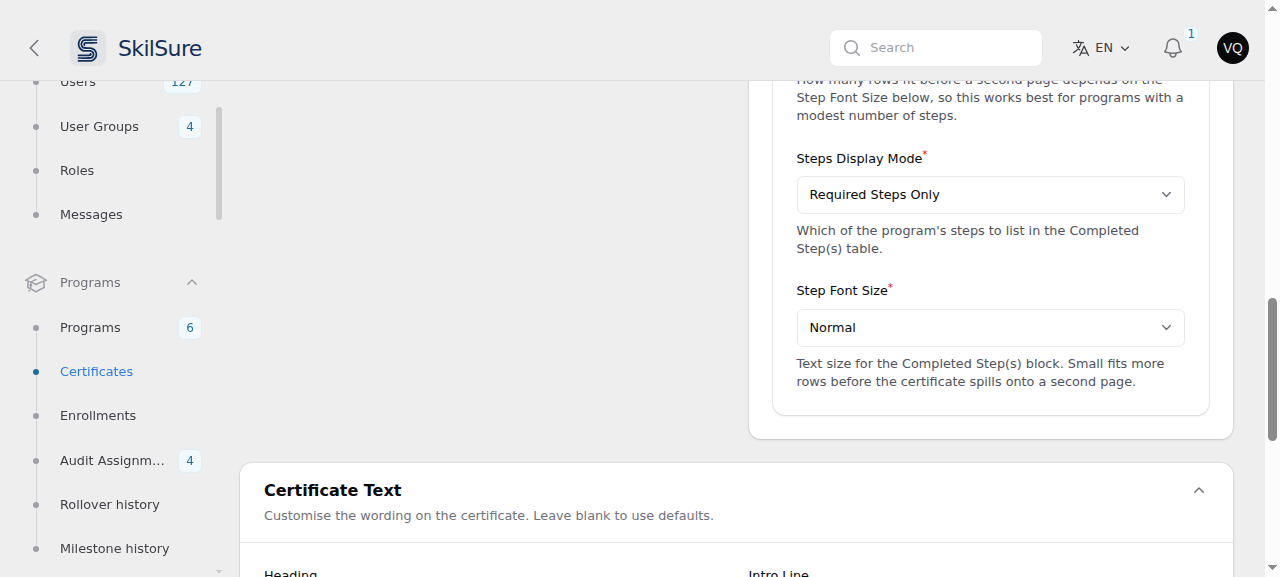 Turning the switch on reveals Steps Display Mode, which decides which steps are listed, and Step Font Size, which sets how large the table prints.
Switch on Enable Display Program Steps Completion, then choose a Steps Display Mode:
| Mode | What's listed |
|---|---|
| Required Steps Only | Only steps that carry at least one required content item |
| Optional Steps Only | Only steps with no required content |
| Both Required and Optional Steps | Every step on the user's path |
A step the user hasn't finished still gets a row — its Date Completed cell is simply left blank. That's deliberate: the table shows the whole picture, not just the finished parts.
The step hosting the certificate itself is never listed, so a certificate never includes a row for the step the user is looking at.
Text size
Step Font Size sets how large the step table prints.
| Size | Heading | Step names and dates |
|---|---|---|
| Normal (default) | 14px | 12px |
| Small | 12px | 10px |
Choose Small when a program has enough steps that the table would otherwise run onto a second page.
Watch the number of steps
The certificate is a single page, and a table that outgrows it spills onto a second page which prints without the border and background. How many rows fit depends on the orientation, the Step Font Size above, and how much other content the template prints — a portrait layout holds noticeably more than landscape. If your program has more steps than fit, switch to Small, choose a portrait orientation, narrow the mode to Required Steps Only, or leave the table switched off.
Which steps count as required
A step is required when at least one of its content items is marked required. This is the same rule the progress bars and completion gates use, so the certificate can't disagree with the rest of the platform about which steps mattered.
What the user sees
The finished certificate prints the member number under the recipient's name and the Completed Step(s) table at the bottom.
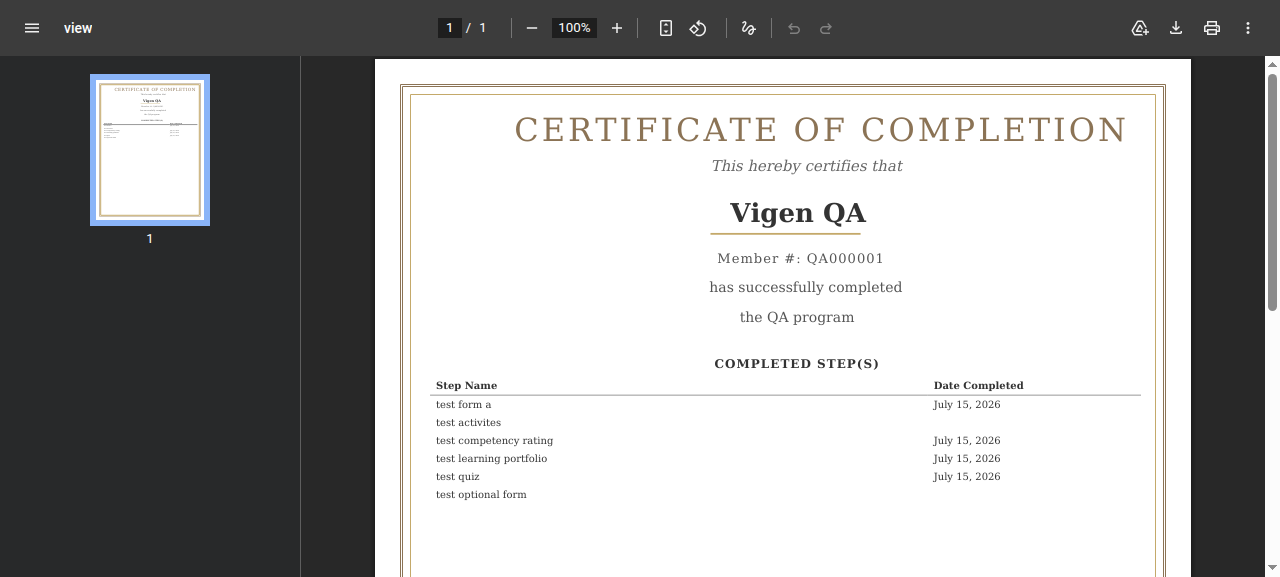 A certificate with the member number and the Completed Step(s) table. Two steps the user hasn't finished show a blank date.
Which year's dates appear
A user enrolled in more than one cycle of a program, such as 2025 and 2026, has a separate set of completion dates for each one. The table shows the dates from the enrolment the certificate was earned in. Some older certificates don't record that enrolment. For those, the table uses whichever of the user's enrolments has the most completed steps, and the newest enrolment wins a tie.
Users reach their certificates from the certificate step in their program, or from My Certificates in their portal. A certificate they have not earned yet shows as Not yet earned on the step, with no download — see When a certificate is awarded if someone who should qualify is seeing that.
Rewording the certificate
The headings on the step table — Completed Step(s), Step Name, Date Completed — and the Member #: label are all editable per tenant. Open Settings → Custom Text, pick Certificates, and look for the rows tagged Certificate PDF. You can set English and French wording independently.
The verification page — what someone sees when they open a certificate's verification link — is editable the same way. Those rows are tagged Certificate verification, and cover Valid Certificate, Expired Certificate, Awarded To, Certificate, Certificate Number, Organization, the page title, and the "This certificate was verified on…" line.
See Custom Text for how overrides work.
The verification page
Every certificate carries a verification link anyone can open — no sign-in — to confirm it is genuine. It shows the certificate name, who it was awarded to, the issue date, the certificate number, and whether it is still valid or has expired.
It shows what the document says, in the language the document was issued in. The name and dates match the recipient's certificate, so renaming a certificate later does not change what a verifier sees for one already issued — the same rule the PDF follows. The page's own labels stay in the reader's language, so someone checking a French member's certificate can still read the page in English.
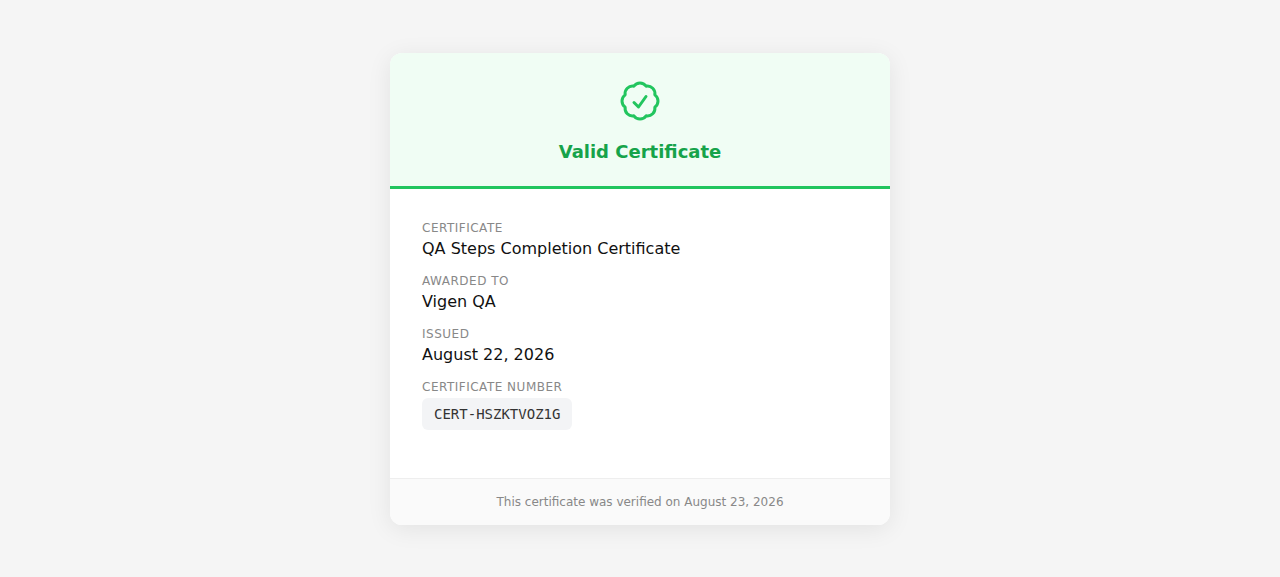 The verification page an outside reader sees. Every label here can be reworded per tenant.
Everyone sees the same dates
Because this page is meant for outside readers — an employer, a regulator — its dates are shown in your organisation's time zone rather than the reader's, so two people checking the same certificate never see different dates.
When a certificate is regenerated
The PDF is generated once and stored, then reused. It is rebuilt when:
- the template changes — so editing a design updates certificates already issued,
- a step listed in the table is completed later, so a blank date fills in once the user finishes that step, and
- the recipient changes their language, so the certificate is reprinted with that language's wording and logo.
This applies to the admin preview too: opening a certificate from Issued Certificates rebuilds it first if it is out of date, so what you review is what the user will get.
Dates and time zones
Dates on a certificate are printed in your organisation's time zone, not the reader's. A certificate is generated once and stored, so it has no single viewer — printing it in the reader's own zone would mean the same saved file showed different dates to different people. Every reader sees the same date, the one your organisation would recognise. See Dates & time zones.